|
Honeynets
A honeynet is a tool that can be used to learn about the targets, methods and tools used by intruders when compromising a system, it consists of a network of production systems that are designed to be compromised. What makes a honeynet different than the more commonly known honeypot is that a honeypot is usually one machine, often with special software like The Deception Toolkit or Specter running on it, whereas a honeynet is a network of computers. The common elements of a honeynet are:
- A firewall computer, which logs all incoming/outgoing connections and provides NAT service and some Denial of Service protection;
- An intrusion detection (IDS) computer. The IDS box is sometimes on the same box as the firewall, but it should be on an entirely separate computer that can see all of the network traffic. It also logs all the network traffic and looks for known exploits and attacks;
- A remote syslog computer. The honeypot is slightly modified so that all commands an intruder would use are sent to syslog. Syslog is then set to remote log to our remote syslog box; and,
- The honeypot itself. Our honeypot can be anything from a default Redhat 6.2 installation to a mirror of one of our production systems. When setting up the honeypot we want to make as little changes to it as possible. Any changes made could tip off an intruder that this is a honeynet.
A honeynet is a very valuable tool for research, intelligence and education: by knowing the methods an intruder uses we can better detect break-ins in the future. Information gathered from honeynets casn be analysed to monitor attack trends. The information collected from a honeynet can also be used to educate people. For instance, log entries that are a result of a break in can be shown to other system administrators so they will know what to look for. It will also provide users with a picture of what kind of attacks are going across their network.
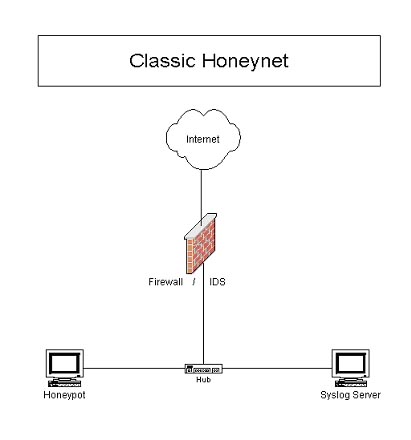
Figure 1: A Classical Honeynet
VMware
VMware is software that allows you to set up 'Virtual Machines' within the confines of one computer. So, if you have a Linux system, you can run that Linux system and run WindowsNT inside of Linux. It is different than dual booting because you can have both operating systems (OS) running at the same time. The OS on which VMware is installed is called the HostOS. The OS that is installed on a virtual machine is called the GuestOS. You can have several Virtual Machines running simultaneously.
There are a couple of different options for networking. One is bridge networking. Bridge networking gives the GuestOS direct access to the network. This means that the GuestOS will look like any other computer on the network. There are some disadvantages when using this method to set up a honeynet. For one, users cannot easily filter or log traffic going to and from the GuestOS. As was stated in the HoneyPot Project's Know Your Enemy: Honeynets paper, this is a very important capability.
The second option for networking is host-only. Host-only networking is a good choice for setting up a honeynet, as it forces the GuestOS to go through the HostOS to get to the network, so a firewall can easily be set up on the HostOS. I will discuss how to do this later in this article.
An important thing to do when configuring VMware is to say no when it asks if you want GuestOSes to be able to access the HostOS's file system. Enabling this option would give an attacker who successfully compromises the honeypot a way to get at the HostOS. If the HostOS is compromised, so is the integrity of the entire honeynet.
For a private subnet, I stayed with the default, 192.168.224.0. It does not matter which private subnet you chose, so long as it is a private address space and you set up your GuestOS accordingly.
Once installed, use the configuration wizard to set up your virtual machines. When it asks what kind of disk to use, I have always chosen virtual disk. This way seems easier to me. You need to give the VMs access to the floppy drive so you can start the install with a boot disk. If you need to use a CD for installation of the OS, be sure to give the VMs access to the CD drive. If you are like me and do Net installs, there is really no need for them to have CD drive access.
Memory allocation is important when setting up your virtual machines. I would suggest you use a box with at least 256 MB of RAM if you are going to do more then one virtual machine. Allocate as much physical memory as you like, I usually give the VM two GB.
Be sure to select host-only networking for the VM when the networking question comes up. You should be all set up, now it is time to install the GuestOS (or GuestOSes, as the case may be.)
The setup I am currently using is VMware 2.0.4 Workstation for Linux. My HostOS is Redhat7.1. I have one VM acting as a honeypot running Redhat 7.1. I do not have a remote syslog server because I have one set up on the classic honeynet that the honeypot is logging to. For a firewall, I initially used IPtables. Recently I have started experimenting with a new tool called Hogwash.
GuestOS - Honeypot
As I mentioned before, I chose Redhat 7.1 for my honeypot because it is a relatively new release and it would be nice to capture some new attacks. When prompted about what kind of installation I preferred, I chose 'Server'. This installed a lot of the commonly-run applications.
Once installed, the honeypot's networking needs to be configured. The IP address should be static, not DHCP. I used the IP 192.168.224.2 for the honeypot. Your /etc/sysconfig/network-scripts/ifcfg-eth0 should have lines like:
BOOTPROTO=static IPADDR=192.168.224.2 NETMASK=255.255.255.0
Once the networking is configured, bash (a common shell program) should be replaced with our modified version that logs commands to syslog. The patch can be found here. The patch can be a bit of a pain to install. It will only work with bash version 2.03. So you have to go get the rpm source for that version. Most of the rpms you will find have other patches applied them (you can see this in the SPEC file). This patch will not install properly with those other patches. I will be posting the rpm (binary and maybe source) soon.
After the modified version of bash is installed, replace all of the other shells with symlinks to the modified bash. We don't want an intruder changing shells on us because we would lose that layer of monitoring.
Next, set up syslog to do remote logging. This can be done by going into /etc/syslog.conf and adding the following lines:
*.info;mail.none;authpriv.none;cron.none @<IP of remote syslog server> authpriv.* @<IP of remote syslog server>
In order for this to take effect, restart syslog.
That is pretty much it for the honeypot. Everything else stays the same. Be sure to start up the applications that you want to be active on the honeynet. On Redhat 7.1, a lot of them come turned off. I would recommend turning on SSH so that you can access it remotely if need be.
GuestOS - Remote Syslog Server
When installing the remote syslog server you will probably want to do a custom installation. This is because the only thing you will want to do is receive syslog messages from your honeynet and have remote access to the box. Keep that in mind when choosing packages to install. You may not even want to install X.
For the most part, the networking set-up is the same as the Honeypot, just use a different IP (such as 192.168.224.3 .)
To set up syslog to listen for incoming syslog messages, restart syslog with the following command:
syslogd -m 0 -r
You can check to see if it is working properly by testing it with the honeypot and checking that it is listening on port 514 (netstat-tupan)
When the server receives a message from the honeypot it will attempt to look up the name for it. This might cause some havoc with our alerting scripts so it might be wise to add the following entry to /etc/hosts
192.168.224.2 Honeypot
This will give it the name before it looks it up at the name server.
The only programs that need to be open on the remote syslog server are 22 (for ssh) and 514 (for syslog).
The IDS should be able to see the traffic from the honeypot to the syslog server. This allows us to get the syslog information even if the remote syslog server is compromised. That is pretty much it for the remote syslog server.

Figure 2: A diagram of a VMware Honeynet
IPtables
IPtables is the successor of IPchains. For creating a honeynet IPtables offers several advantages that IPchains does not. For one, it is a stateful firewall. This allows us to set up alerts based on the state of a connection. So, when someone initiates a connection, we can set up a rule to flag it based on it being new. IPtables also supports limits. This means we can only allow five connections out of the honeyport per hour. This is a good way to lessen the threat of Denial of Service attacks and massive scanning.
Since we will be using the host-only network option in VMware, we are going to have set up Network Address Translation (NAT) so that the GuestOS can access the Internet. First, we should set up an IP alias on the HostOS.
Ifconfig eth0:1 <public IP> netmask <netmask> up
Next, we need to set up our firewall script. The way I like to set it up is so that the HostOS has its own IP. This way we can communicate with the HostOS normally without having to forward any ports. Notice that the remote syslog server does not have access through NAT except through a forwarded port for ssh access. In this case I forward port 24 to the remote syslog server. There really is no need for it to be able to communicate with the Internet. Below is a simple one that will set up NAT.
 #!/bin/sh   #Flush the tables /sbin/iptables -F /sbin/iptables -F -t nat   #1 to 1 NAT /sbin/iptables -t nat -A PREROUTING -d <IP alias IP> -j
  DNAT --to-destination <HONEYPOT IP> /sbin/iptables -t nat -A POSTROUTING -s <HONEYPOT IP> -j
  SNAT --to-source <IP alias IP>   #Forward ssh to the remote syslog server /sbin/iptables -t nat -A PREROUTING -I eth0 -p tcp -dport 24 -j
  DNAT -to-destination <IP of remote syslog server>   echo 1 > /proc/sys/net/ipv4/ip_forward
Now NAT should be set up. If it is not working, you may want to check your routes. Logging will be the next thing to set up. You want to log everything. The following IPtable rules should do that:
 /sbin/iptables --table mangle --append PREROUTING -i eth0 --jump
  LOG --log-level 6 --log-prefix "IN: "   /sbin/iptables --table mangle --append PREROUTING -i vmnet1 --jump
  LOG --log-level 6 --log-prefix "OUT: "
In order to give us a good alerting capability, we should flag all new incoming and outgoing connections. A script can pick up on these flags and alert us. Here are the IPtables to flag log entries that are new connections:
   /sbin/iptables -t mangle -A PREROUTING -i vmnet1 -m state --state NEW -j
LOG --log-level 6 --log-prefix "OUTBOUND: "    /sbin/iptables -t mangle -A PREROUTING -i eth0 -d <IP alias IP>state --state NEW -j
LOG --log-level 6 --log-prefix "INBOUND: "
Another thing IP tables can do is limit traffic. This can provide us with protection against someone using our honeynet to Denial of Service someone else. These rules are kind of fickle though, so be careful.
   /sbin/iptables -t mangle -A PREROUTING -p tcp -m state --state
 ESTABLISHED,RELATED -i vmnet1 -s <GuestOS IP> -j ACCEPT   /sbin/iptables -t mangle -A PREROUTING -p tcp --syn -m limit --limit
  20/h -i vmnet1 -s <GuestOS IP> -j ACCEPT   /sbin/iptables -t mangle -A PREROUTING -p tcp -i vmnet1 -s
  <GuestOS IP> -j DROP
The firewall should now be set up. It might be a good idea to watch the logs and see what kind of traffic you see and block normal garbage traffic.
Snort
Snort is an excellent IDS to use on a honeynet, as it is very flexible and powerful. A good configuration for Snort can be found in the Honeynet Project paper: Know Your Enemy: Honeynets. That is the set-up I use. To run Snort, I use the command:
snort -b -D -c /root/snort/snortconf -i vmnet1 -l /var/log/snort
Alerting
In order to alert myself of nefarious activity, I use several custom-made scripts written in Perl. There are three of them: one watches for incoming connections, one watches for outgoing connections and the last watches the snort logs. They all send e-mails to me when they see something new. The script that watches for outgoing connections will also e-mail me when it sees something because it would almost certainly be a break-in. (I plan on posting the scripts once I clean them up.) There are some important things to take into account when alerting.
Throttling, or controlling the number of alerts you receive, is very important. You don't want to spam your mailbox or use up all your Web messages (in the case of certain cell phone providers.) I configure throttling by time and amount. I will only send a new alert every couple minutes. In the case of outgoing connection alerts, I use the time throttle and I limit the amount of alerts that can be sent total because it gets sent to a cell phone.
The script should know that there are times when it should not send alerts. For instance, it should not send an alert when it sees an outgoing DNS request. When someone just scans you, it could result in the honeypot trying to look up the name. Getting woken up at 3:00 AM for this isn't fun, believe me. Having the script look over Auth requests might be also be wise, as they can result from some FTP scans.
Advantages/Disadvantages of VMware Honeynets
A VMware honeynet has several distinct advantages over a classic honeynet. Some of which are:
- It is cheaper. It only takes one computer, thus the primary expense is the cost of Vmware;
- It is easier to operate, as the user only has to deal with one set of hardware;
- It is flexible, as the user can easily run NT and Linux honeypots on the same machine at the same time; and,
- It offers more efficient use of space, as it requires only one Ethernet cable.
There are also some disadvantages to a VMware Honeynet:
- It constitutes a single point of failure. If there is a hardware problem or something goes wrong with the HostOS, the entire honeynet could cease to function properly; and,
- A limited amount of virtual machines can run at the same time. This depends on amount of memory available.
Future
One project I am working on is replacing IPtables with a tool called Hogwash. Hogwash is a layer two packet scrubber. This means it acts like a bridge. It takes packets off of one interface and sends them out another.
What makes Hogwash really special is that it can drop or change packets in route and uses snort as a signature-matching engine. One of the biggest risks in running a honeynet is the possibility the honeypot will be used to attack an outside machine. Blocking all outgoing connections could be one solution but that will not allow the intruder to retrieve their tools. With Hogwash, if an intruder attempts to send exploit code to an outside host, Hogwash can see it and drop that specific packet. Another example would be the IIS Unicode vulnerability. Hogwash can replace the Unicode characters with harmless ones, making the exploit fail. Once I have Hogwash set up, I will write a follow up paper about building a honeynet with Hogwash.
Conclusion
VMware is a powerful tool in the development of an effective honeynet. It used to take three or four separate boxes to set up a honeynet, now it only takes one. Running a honeynet with VMware is usually cheaper than running one with four separate computers and also saves a lot of space. While the risk of having all your eggs in one basket is important to remember, the benefits make it a risk worth taking.
Finally, I have never heard of someone breaking out of a Virtual Machine and into the HostOS. All the same, it may be a good idea to set up another layer of monitoring outside of the VMware Honeynet just in case someone does figure out how to do this. It would be great to record how they did it!
|